Travels
Interested in GPS? I wrote this primer to make sure I had some notes on everything I learned when taking my first steps into the satellite World. Read this brief intro, surf some of the links on the web I've listed, and if you're still interested, I'd advise buying a copy of "GPS for Dummies" and reading that.
Your GPS may come with some proprietary software. If it has mapping features, you can buy maps and even software for turn-by-turn directions, but this is usually not cheap. You will not be able to load digital maps from other sources (e.g. a scanned image) onto your device. A 'generic' software I use is OziExplorer (an alternative is Fugawi). OziExplorer allows you to view any image (usually a digital map or an aerial photo), calibrate it with latitude and longitude points (and elevation data), add waypoints or landmarks to this image, view or measure a track you took, and link to most commercial GPS devices. From a PC or laptop, you can upload and download data to most GPS devices, and so either measure a track you took back at home, or add waypoints to you GPS device so you can find your way out in the field. You can also create fancy 3D images of these routes. You do not need a GPS to use OziExplorer, it just extends the feature set if you have one. A nice freebie is TrackAn for OziExplorer tracks. This allows you to analyse your track data in more detail than Ozi allows. Digital Maps You can purchase digital maps for many areas. In the US this is relatively inexpensive, whereas in other countries tends to by quite pricey. In Switzerland, for example, the Swiss Topo50 set for the country cost about $400. Ouch! An alternative (apart from illegal sources) is to scan a paper map.
3D Maps
[This primer was written before Google Earth was released. If you
pay $20 for the upgrade to Earth Plus, you can download a GPS track to
get the same result for a fraction of the trouble. Google Earth does
not give you all the bells and whistles that OziExplorer has, but it
cuts through a lot of the hard work if all you want to do is create these
3D images.]
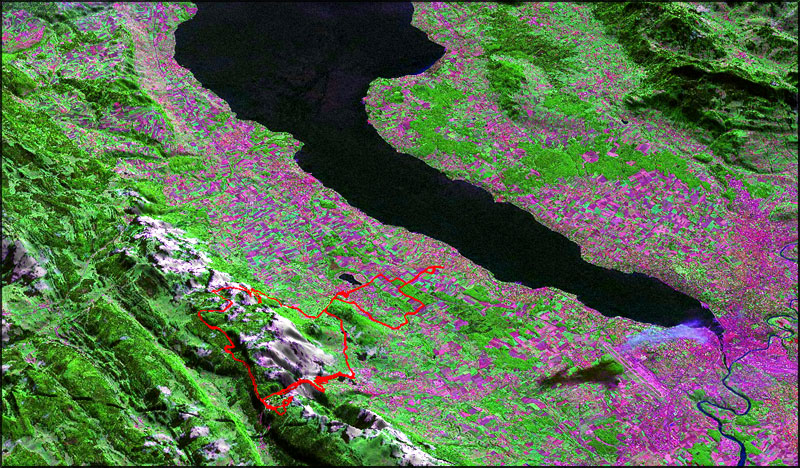
Want
to create cool but very geeky 3D pictures like this one? Here's how I did
it... By
the way, this is the Geneva basin, and the faint red line marks a bike
tour into the Jura. It was made from a MrSID satellite image.
Before
we start cooking, though, you might want to get some more grounding by
clicking here or here.
Or get some expert help here or
general GPS help here. Of
course, you can skip all these steps now by forking out $20 for Google
Earth Plus...
1. Scan a paper topo map or download a digital map, aerial photo or satellite photo from the web. You need a picture that represents your area of interest, but it doesn't really matter whether you choose maps or photos. Scale is not important, but you need to recognise local features.
2. Get OziExplorer. This software allows an image file (e.g. a scanned map) to be linked to latitude and longitude coordinates. It also has a load of other features like measuring distances, plotting routes, showing waypoints and linking to your GPS device. Alternative products include Fugawi or Topofusion. Using OziExplorer is pretty intuitive, but requires a little patience at first. There is a useful user-group on yahoo for Q&A's.
3. Get OziExplorer 3D - this is an add-on to OziExplorer which displays your maps in 3D. This requires global 3D data (DEM) to work. 3DEM is a freeware version of the same, but is slightly more difficult to use as it is not integrated with OziExplorer.
4. DEM data - can be downloaded for the whole globe here. Just click on your area of the World. Each dataset is one degree of latitude/longitude - for example Geneva is in 46N, 6E (which extends to 47N, 7E). This data has 90m accuracy (one pixel is 90M²) and is the best source for global data. However, your particular spot on the World might have better data (e.g. the USA) so it's worth looking around. VTerrain has a list of DEM datasets and explains the subject well. If you don't know where you are on the World map, the Degree Confluence Project is an easy place to find out. Or just read the map reference on any decent local map.
5. Clean the DEM data. The raw DEM data may contain blanks or missing data, which will disrupt the look of your 3D maps. Run SRTMFill on your downloaded data to clean it. It comes with help files and is pretty straight forward. TIP: download and clean all the data (steps 4 and 5) you are likely to need as you only need to do this once. I took the whole of Switzerland plus some of the surrounding areas which was about ten grid squares, or ten sets of data.
6. Start up OziExplorer. You should spend some time playing with this first before you start making 3D pictures.
OziExplorer is really a GPS tool, and not just a toy for fancy 3D gimmicks. These pictures are baby steps, my first laboured attempts at 3D imaging. I'm still learning about better data sources and improved 3D rendering which might make these drawings more photo-realistic in the near future.